Arrow Panels Part 1: Making New Panels
Project Breakdown
Cost: $100-400
Time: 0-2 hours
Skill level: Low-Medium
What You Need
Polycarbonate sheets
Table saw (or similar)
T118A jigsaw blade
Dust Mask
Protective eyewear
Info on Plastics
Here’s the deal. Plastic can get very, very expensive. Below are a few options which will be suitable for replacing panels, ranked from highest to lowest quality.
Note: Factory DDR arrows are 1cm thick. Since all these parts are made in Korea/Japan, they come with metric measurements. If you’re in the US, finding 1cm (0.39″) is going to be challenging. The next best thing is plastic with a .375″ thickness which is widely available in the US. The difference is negligible once you have them installed on your pad and you can always add a few rubber strips to make up the difference.
You could always go thinner and make up the difference with rubber/foam modding, however keep in mind the thinner the material the more likely your foot will go through it. You may have to go with a thinner thickness for acrylic as it seems to be manufactured in different thicknesses than polycarbonate. Do not exceed materials that are >.4″ thick as you won’t have enough space for the arrow to depress under the brackets.
Step 1: Choosing Plastic
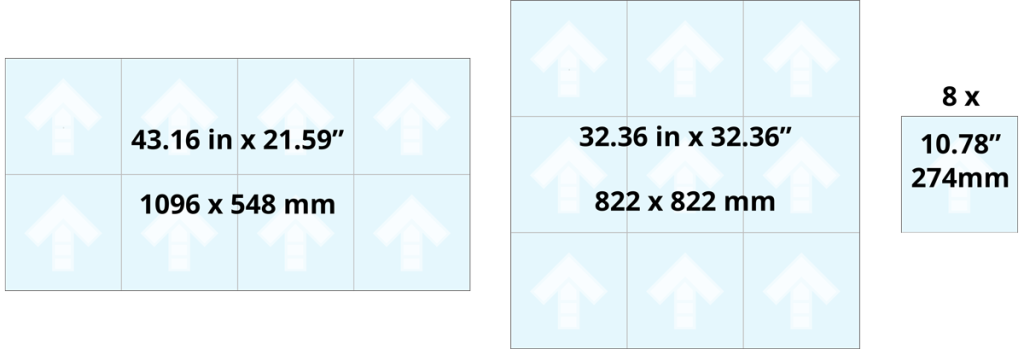
If you’re cutting yourself you’ll need a minimum sheet of 32.38 x 32.38 in or 43.16 x 21.59 in. Each panel is 10.782 in. (or 2742mm).
Links are provided for where to buy, however I would suggest looking to source these from a local plastics manufacturer in your area. You’re much more likely to find a better deal if you look close to home. Lexan and Acrylite are popular brands for polycarbonate and plexiglass (respectively) though any brand is fine.
Plastics for arrow panels
Lexan Polycarbonate MR-10 – Abrasion resistant ($$$$)
This is the Rolls-Royce of plastic. Polycarbonate is incredibly strong stuff and will last you a lifetime. Abrasion resistance reduces scratching caused by shoes which will inevitably happen over time without AR.
ACRYLITE® Optical mar resistant ($$)
Acrylite is a good substitute for Lexan (polycarbonate). The clearness is higher than that of Lexan, though it’s not quite as durable and you’re slightly more susceptible to cracking.
Clear polycarbonate sheet ($$)
This is the material I chose to use with my machine. The lack of abrasion resistance is definitely noticeable if you look up close. If you keep your face away from the panels the scratches are barely noticeable and (IMO) don’t take away from the quality of the panel.
Clear acrylic sheet ($)
The cheapest option is to go with a basic acrylic sheet. Acrylic isn’t quite as strong as polycarbonate, but it will still do the job with a higher thickness. As with polycarb, without abrasion resistance you’re susceptible to surface scratches but these will only be noticeable if you put your face right up to the arrow.
Step 2: Cutting
If you choose to get your plastic cut by the manufacturer, you can pretty jump to Arrow Panels Part 2: Arrow Decals because you’re good to go.
You may decide to cut all the plastic pieces from a single sheet, or order individual sheets and just cut the edges. For either method you choose, use the following guide to get the right size.
![]()
Alternatively, if you have an existing arrow panel, you can trace the measurements of it onto the plastic sheet for cutting.
Cutting
If you’re cutting a large sheet into individual arrows, you may have a hard time with the table saw. Personally I haven’t tried this. I chose to have my panels pre-cut into squares and cut the remainder with a table saw and T118A jigsaw blade. If you have access to some sort of tech space, a laser cutter would be ideal for cutting. If you’re not experienced with cutting plastic you may want to find a friend who is to help.
Your plastic will come with a protective coating on both sides. Do not remove this material until you’re done cutting. Keeping the protective paper on will help reduce knicks along the side of the cut.
Trace the cut lines onto the protective paper.
Stop! Before you go any further, get your safety gear on. Wear protective glasses and a dust mask. You don’t want nasty bits of plastic getting into your eyes or lungs.
Set up your table saw with the blade. I found a blade made for metal materials works best as it has finer teeth.
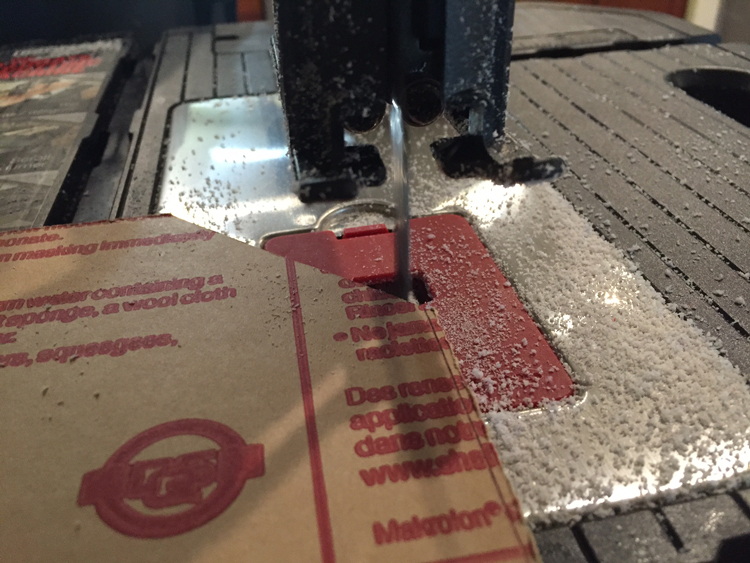
Run your cut through quickly. If you dally and let the blade run, it will melt the plastic and you’ll end up with bubbles along the edges. Apply firm pressure to the panel as you run it through to reduce vibration.
Cut each diagonal corner and repeat for each panel.
Step 3: Clean up
You’ve undoubtedly made a mess with all the plastic so be sure to clean up your space. Remove the plastic film from the panels and move on to Arrow Panels Part 2: Arrow Decals.
0